Style Customizations - Tips & Tricks
[trennlinie][/trennlinie]
Important notes for editing
[trennlinie][/trennlinie]
Before you start editing your product, it is imperative that you observe the following instructions - otherwise this may lead to undesired behavior or compromise the support claim!
1. Save the original files before editing your product!
2. Switch - to avoid unwanted behavior in case of errors - your project into the "maintenance mode".
3. So that our products also remain updateable don't remove the style-protection.
[trennlinie][/trennlinie]
Adjustment options
[trennlinie][/trennlinie]
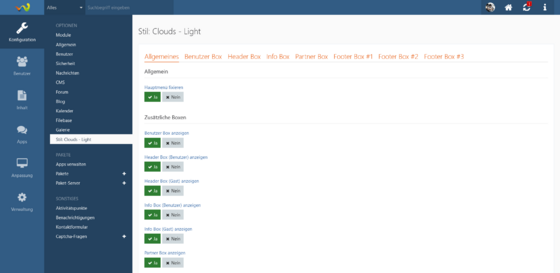
Each of our products has an individual design-tailored ACP configuration plugin which makes it significantly easier for you to edit the most important basic functions. To be able to configure your design, log in to the administration menu and switch to "Configuration" in the left sidebar and then to the menu item "Style: Name - XYZ".
There you can configure the most important basic functions problem-free and above all without special knowledge. For example, you can edit or disable the additional boxes included in the design. This allows you to customize your design to suit your needs and the needs of your community!
[trennlinie][/trennlinie]
Change Style colors
[trennlinie][/trennlinie]
Note: If you would like to offer multiple color variants, you can duplicate your respective product via "Copy Style" and perform the steps below again. Duplicating a style is possible in the style editor on the top right with the button "Copy style".
1. Log in to your administration menu and switch to "Customization" in the left sidebar and then to the "Styles" menu item.
2. Now select your style and choose "Edit" ("Pencil" icon), then switch to the menu item "Color Palette" in the TabMenu.
3. In the color palette, select the category "wcfHeaderMenu" in the right sidebar. Now you can change the main color of the theme to your desired color - in most of our products these are the variables $wcfHeaderMenuBackground, $wcfHeaderMenuLinkBackground as well as $wcfHeaderMenuLinkBackgroundActive (More information product description). Then scroll to the bottom of the page and click the "Submit" button. Your changes are now saved!
[trennlinie][/trennlinie]
Exchange graphics / pictures
[trennlinie][/trennlinie]
Of course you can and may exchange all graphics which are included in your design / your product. Here, a distinction is made between the "logo" and the other graphics. (Original graphics which are included in the style / product, however, may not be used for other projects, styles or products!)
Exchange logo(s):
1. Log in to your administration menu and switch to "Customization" in the left sidebar and then to the "Styles" menu item.
2. Now select your style / your desired product and choose "Edit" ("Pencil" icon), then switch to the menu item "Global Settings" in the TabMenu.
3. In the category "Page logo" you can now upload your logo (for both desktop and mobile (smartphone, tablet) variants) as well as specify the width and height of your logo. (Please make sure that the specified height and width actually correspond to your graphic). Then scroll to the bottom of the page and click the "Submit" button. Your changes are now saved!
Exchange other graphics:
1. Log in to your administration menu and switch to "Customization" in the left sidebar and then to the "Styles" menu item.
2. Now select your style / your desired product and select "Edit" ("pencil" icon), then stay in the TabMenu on the menu item "Data".
3. Scroll down a little until you have arrived at "Additional images" in the category "Files". Now you can replace your desired graphics. Make sure that both the file name and the file extension are identical.
[trennlinie][/trennlinie]
Edit CSS & Template
[trennlinie][/trennlinie]
Note: If you want to make further changes in the CSS or in the templates, this is permitted - but is done at your own risk.
Insert custom CSS:
Again don't remove the style-protection! Inserting as well as editing individual CSS is also possible with activated protection!
1. Log in to your administration menu and switch to "Customization" in the left sidebar and then to the "Styles" menu item.
2. Now select your style and choose "Edit" ("Pencil" icon), then switch to the menu item "Advanced Settings" in the TabMenu.
3. Paste your individual CSS declarations / individual SCSS variables into the editor field "Own declarations". Then scroll to the bottom of the page and click the "Submit" button. Your changes are now saved!
Tip: Should a declaration not work, try to give the respective property a !important to be added.
Template editing:
To avoid potential errors, create a custom template group in the ACP under "Customization" -> "Template Groups" -> "Add Template Group" and select it in your design. The newly created template group can be selected or assigned in the ACP under "Customization" -> "Styles" -> "Edit Style" -> "Data" -> "Template Group".
If errors occur or your own templates are no longer needed, you can always switch back to the original template group that was supplied in the style.
[trennlinie][/trennlinie]
Alternative instructions by WoltLab:


